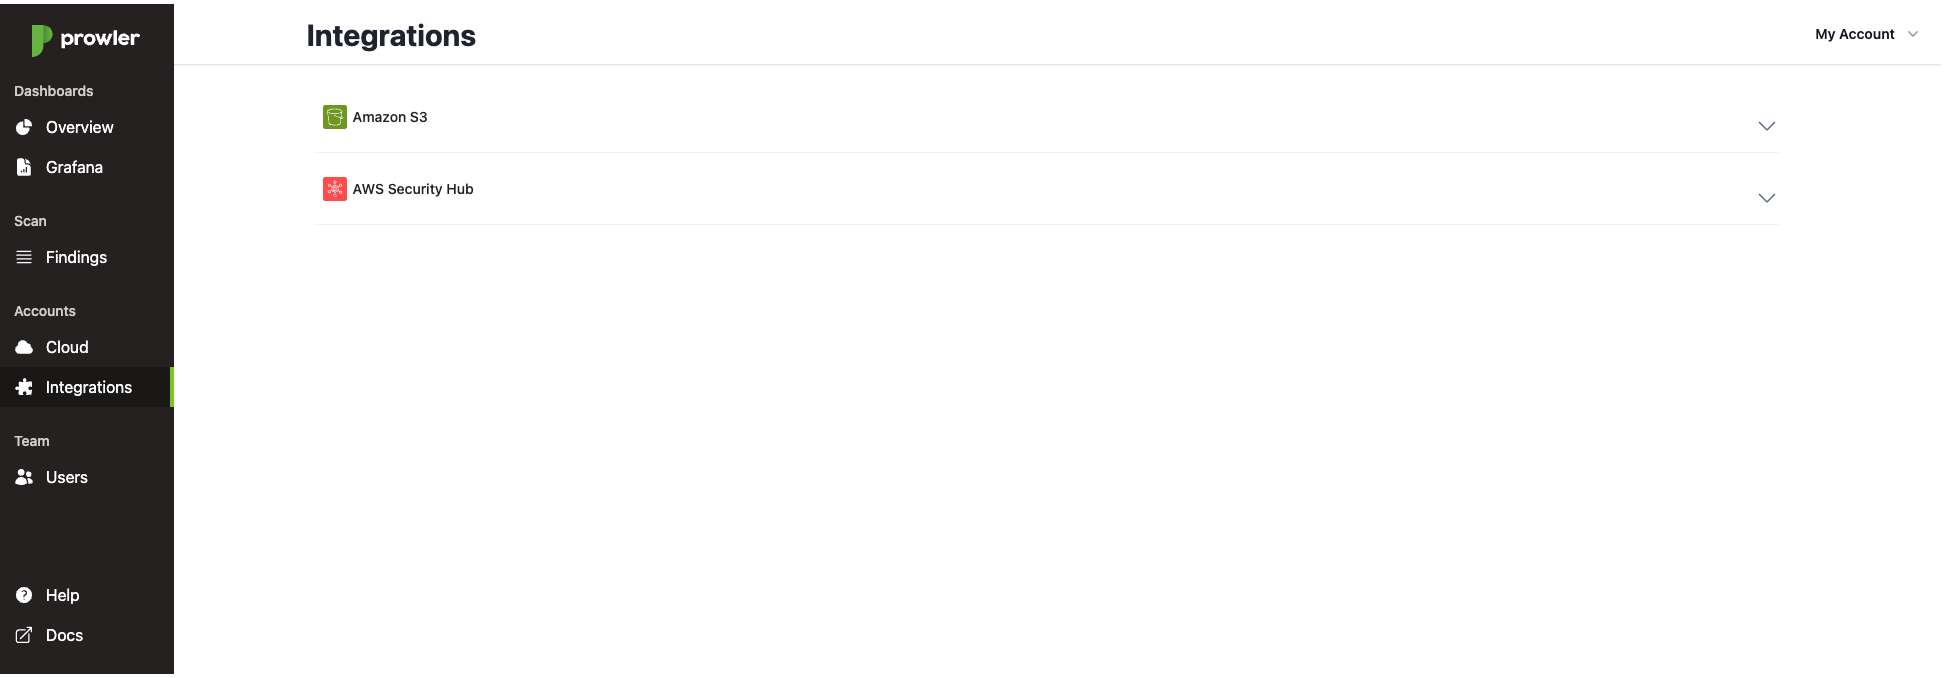
Amazon S3
Prowler SaaS provides the ability of sending the results of scanning your AWS account to an AWS S3 bucket of your choice, belonging or not to one of the AWS accounts already registered to Prowler SaaS.
That feature can be configured in the Integrations section.
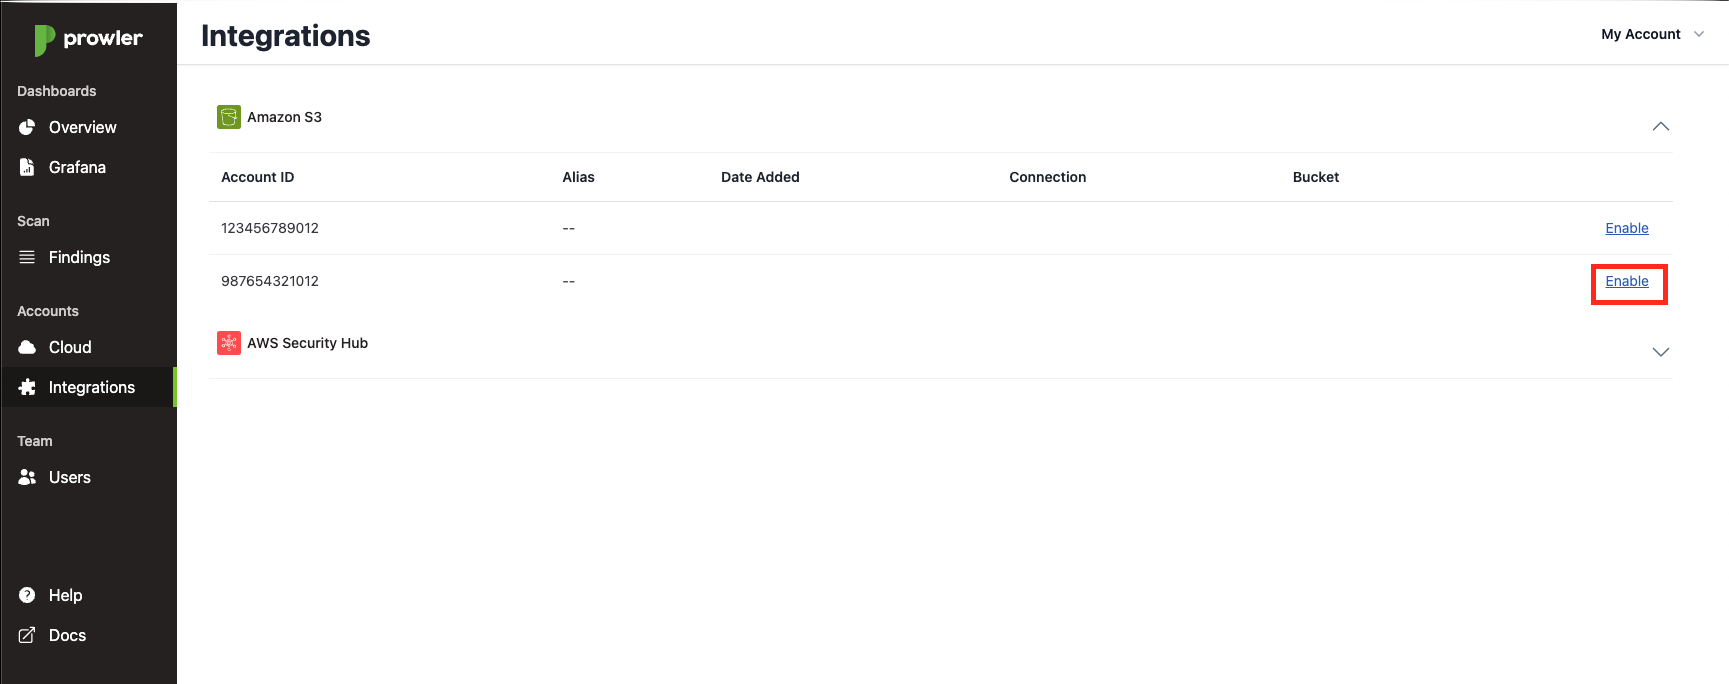
This integration is configured at AWS account level, each AWS account can have an S3 output bucket configured. When it is enabled and configured the results of scanning your AWS with Prowler SaaS will be stored in the bucket you have chosen.
This means that you will receive the results of the scan in the following formats, providing the flexibility of using Prowler results for your custom integrations:
csvhtmljsonjson-ocsfjson-asff
Note
The json-asff file will be only present in your configured Amazon S3 Bucket if you have the AWS Security Hub integration enabled. You can get more information about that integration here.
Note
Take into account that enabling this integration will incur in costs in Amazon S3, please refer to its pricing here for more information.
Enable Integration
S3 integration can only be enabled by admins. To do so you must go to the Integrations tab, and click on "S3 Bucket Output". A dropdown will be expanded listing all the AWS accounts, choose the AWS account you want its scan results to be exported and click on Enable.
A modal should appear, detailing the steps you need to follow to enable the integration:
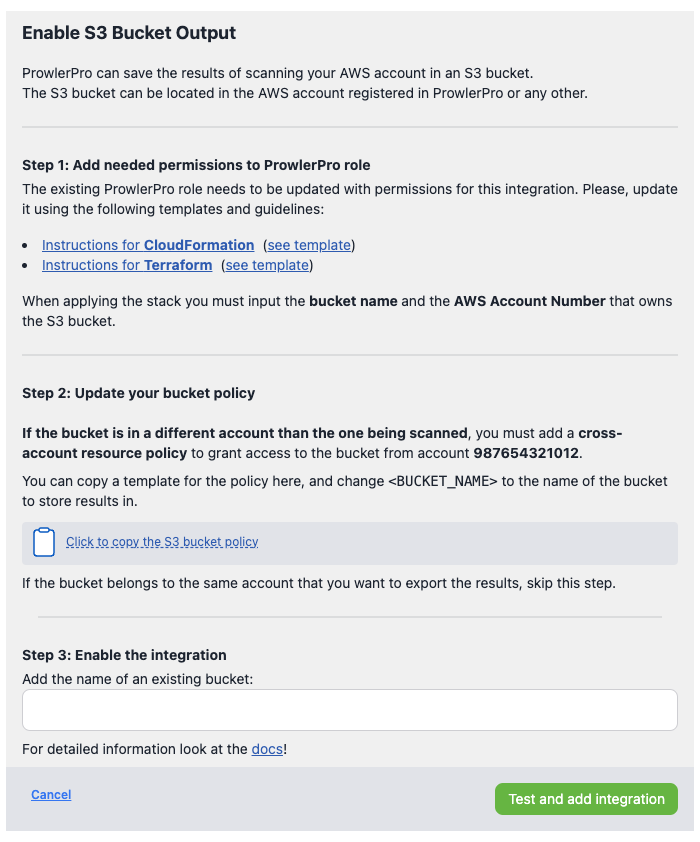
Step 1: Add needed permissions to Prowler SaaS role
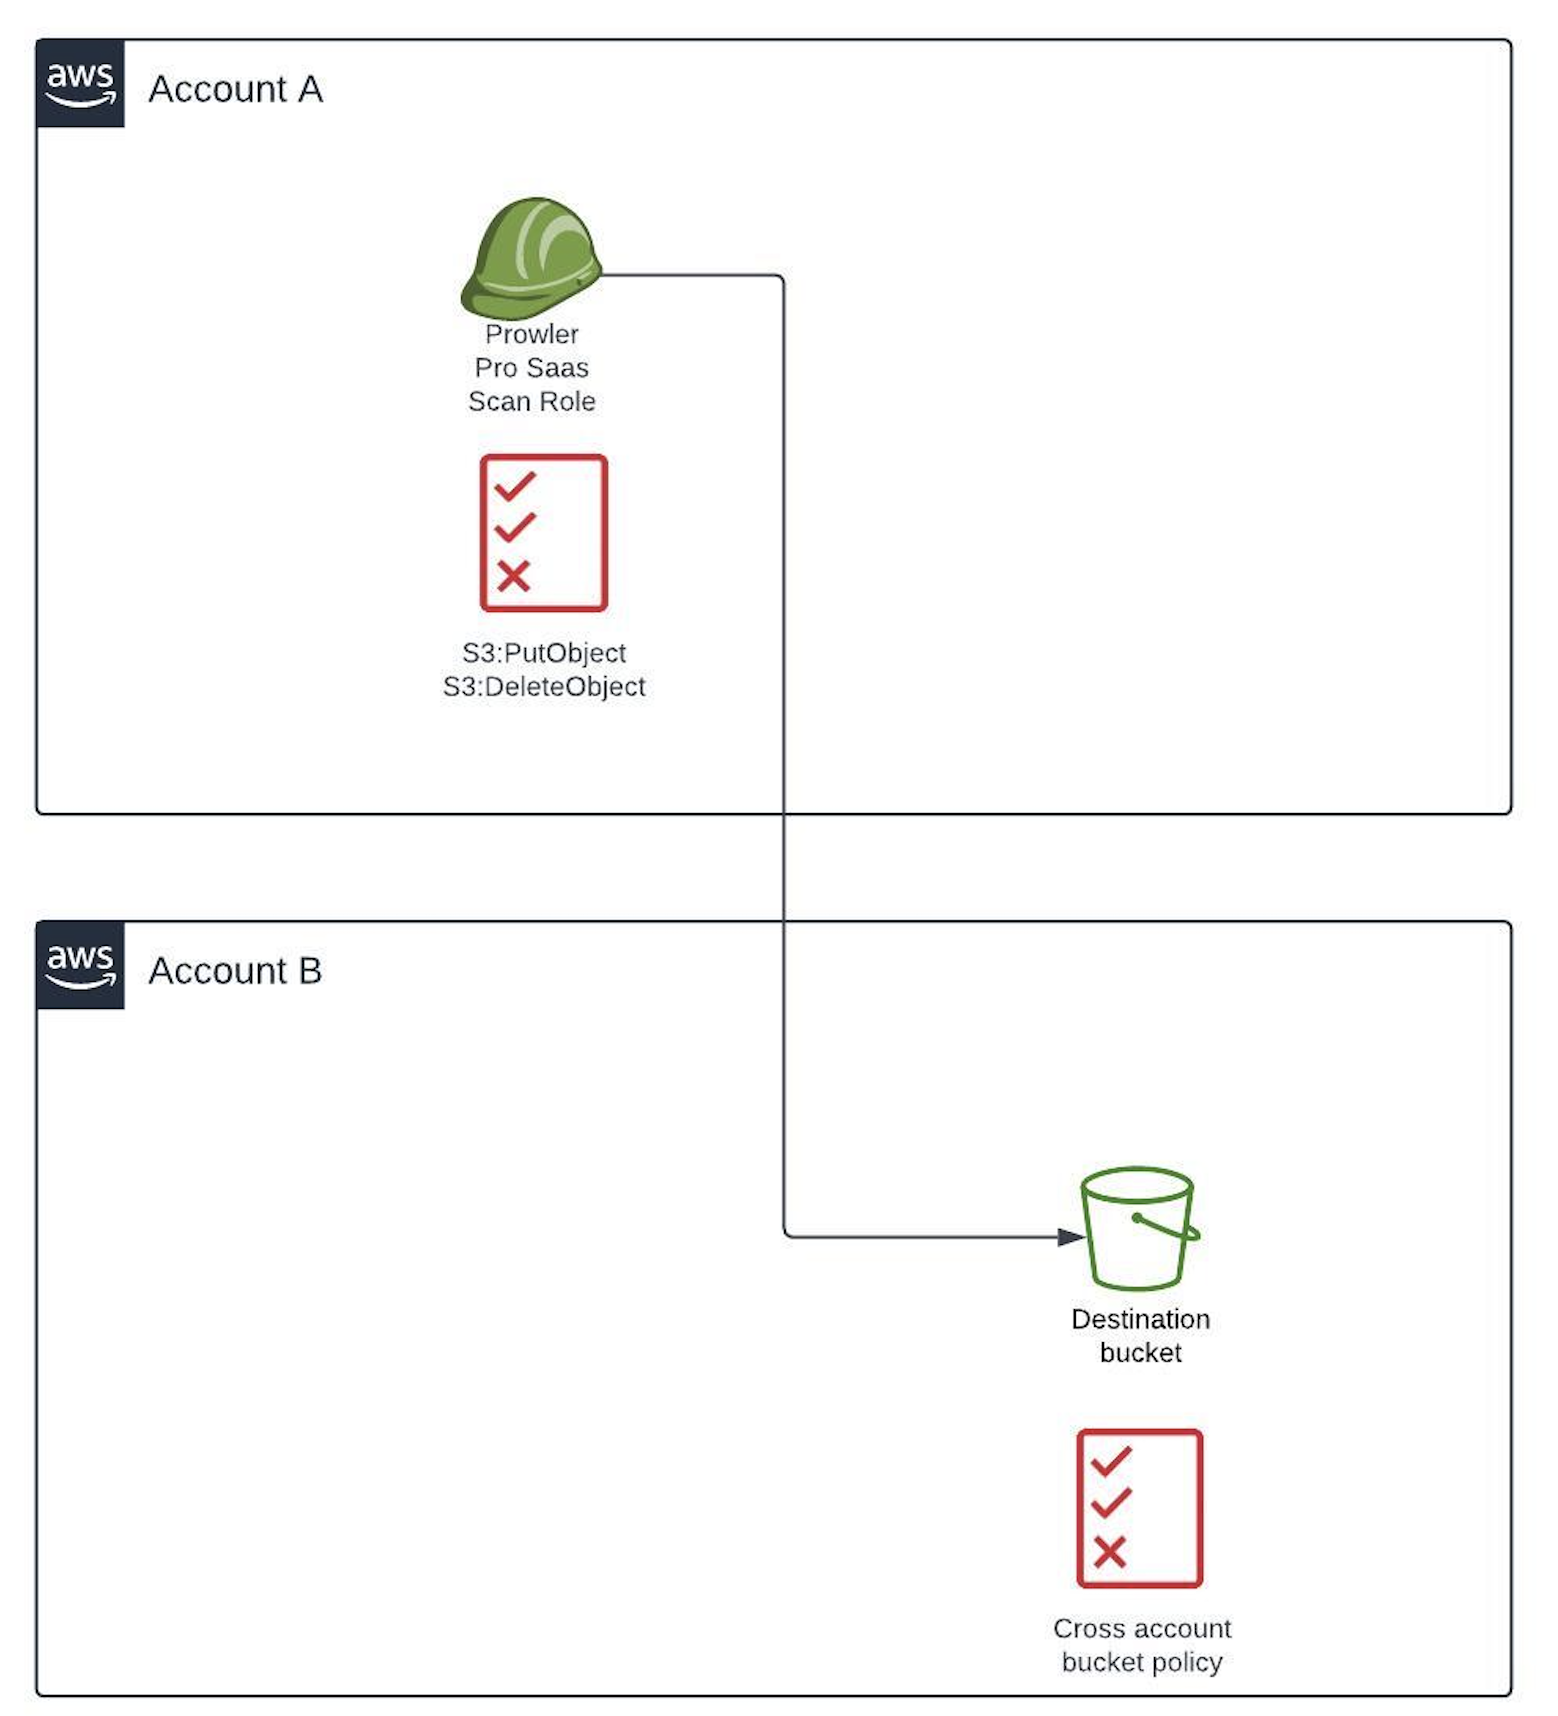
First of all, you need to add permissions to the Prowler SaaS role (ProwlerProSaaSScanRole) already deployed in the AWS account you want its scan results to be exported (987654321012 in the previous example). The permissions are the following:
{
    "Version": "2012-10-17",
    "Statement": [
        {
            "Condition": {
                "StringEquals": {
                    "s3:ResourceAccount": "<BUCKET AWS ACCOUNT NUMBER>"
                }
            },
            "Action": [
                "s3:DeleteObject"
            ],
            "Resource": [
                "arn:aws:s3:::<BUCKET NAME>/*ProwlerProBeacon"
            ],
            "Effect": "Allow"
        }
    ]
}
{
    "Version": "2012-10-17",
    "Statement": [
        {
            "Condition": {
                "StringEquals": {
                    "s3:ResourceAccount": "<BUCKET AWS ACCOUNT NUMBER>"
                }
            },
            "Action": [
                "s3:PutObject"
            ],
            "Resource": [
                "arn:aws:s3:::<BUCKET NAME>/*"
            ],
            "Effect": "Allow"
        }
    ]
}
{
    "Version": "2012-10-17",
    "Statement": [
        {
            "Condition": {
                "StringEquals": {
                    "s3:ResourceAccount": "<BUCKET AWS ACCOUNT NUMBER>"
                }
            },
            "Action": [
                "s3:GetBucketLocation"
            ],
            "Resource": [
                "arn:aws:s3:::<BUCKET NAME>"
            ],
            "Effect": "Allow"
        }
    ]
}
You can add it manually or using the Cloudformation and Terraform templates that are linked in the modal, also you can find it below:
In order to apply those templates, please refer to the following instructions per each IaC provider.
Update Prowler SaaS role with CloudFormation via AWS CLI
Execute the following AWS CLI command:
aws cloudformation update-stack \
  --capabilities CAPABILITY_IAM --capabilities CAPABILITY_NAMED_IAM \
  --stack-name "ProwlerProSaaSScanRole" \
  --template-url "https://s3.eu-west-1.amazonaws.com/prowler-pro-saas-pro-artifacts/templates/prowler-pro-scan-role-s3-integration.yaml" \
  --parameters "ParameterKey=ExternalId,BucketName=YourBucket,DestinationBucketAccount=YourBucketAccount,UsePreviousValue=true"
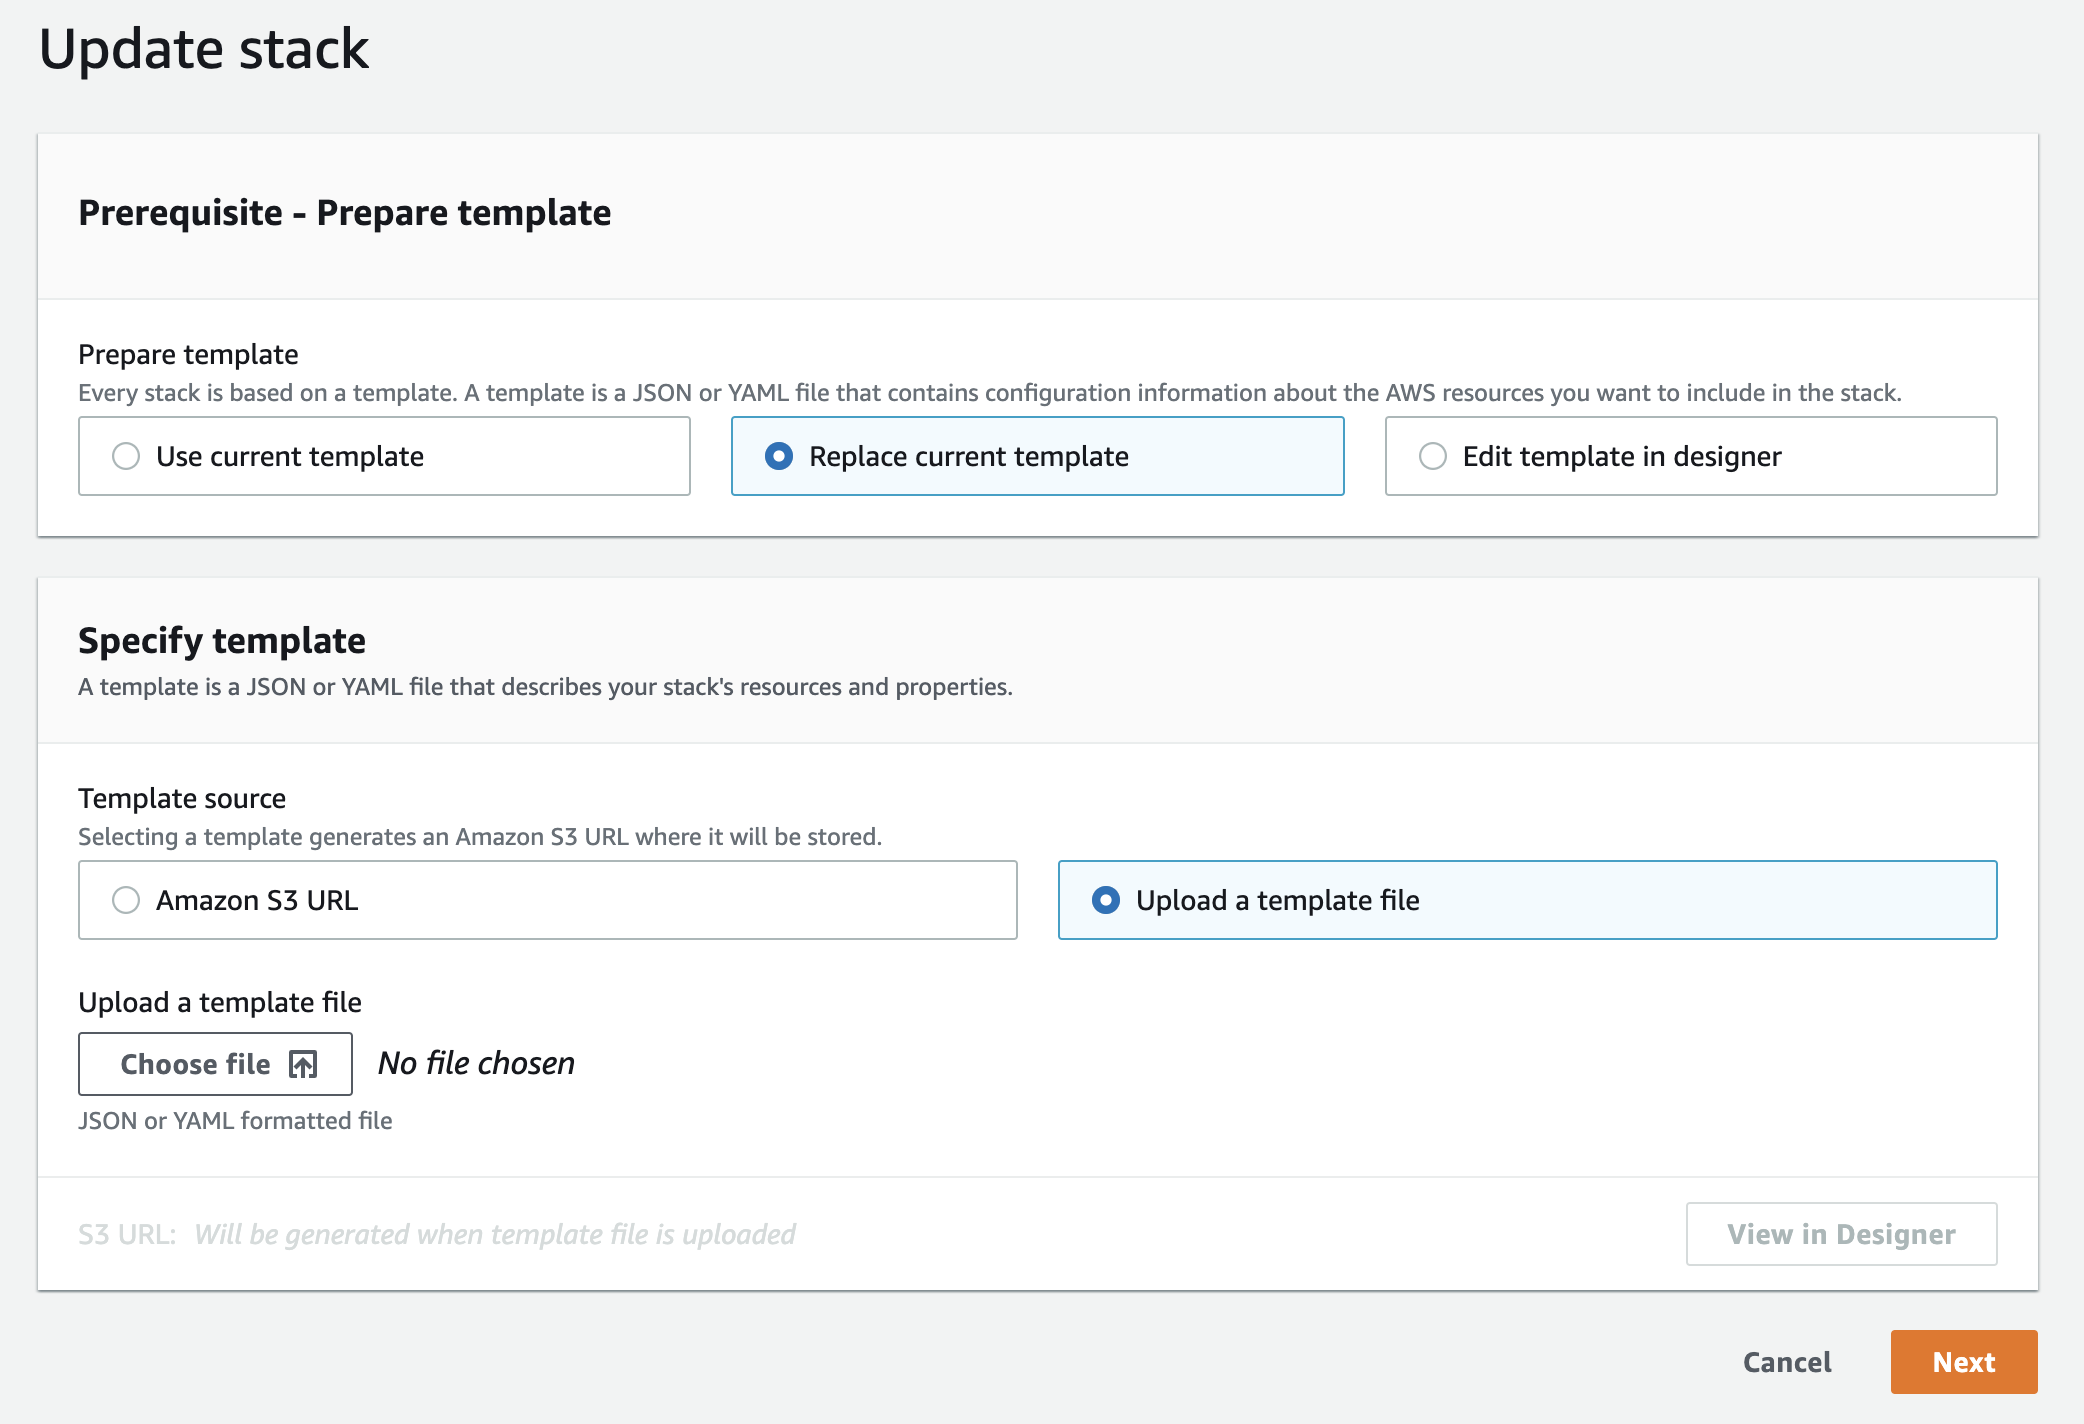
Update Prowler SaaS role with CloudFormation via AWS Console
To add the S3 integration to the ProwlerProScanRole using CloudFormation, please follow the next steps.
-
Go to the CloudFormation service in the AWS region used to deploy the ProwlerProScanRole.
-
Select the Stack Name, by default "ProwlerProSaaSScanRole" and click on "Update"

-
Under prepare template, select "Replace current template" and "Upload a template file". Then, upload the new ProwlerProSaaSScanRole IAM Role template.
-
In the next screen "Specify stack details" leave "ExternalID" as it is, since its value is required to scan your AWS account.
The fieldBucketNamemust be filled with the destination bucket name (without any folders/paths or trailing slashes(/)), the bucket where you want your scan results to be stored.
The fieldDestinationBucketAccountmust be filled with the AWS account ID of which the destination bucket (referenced inBucketName) belongs.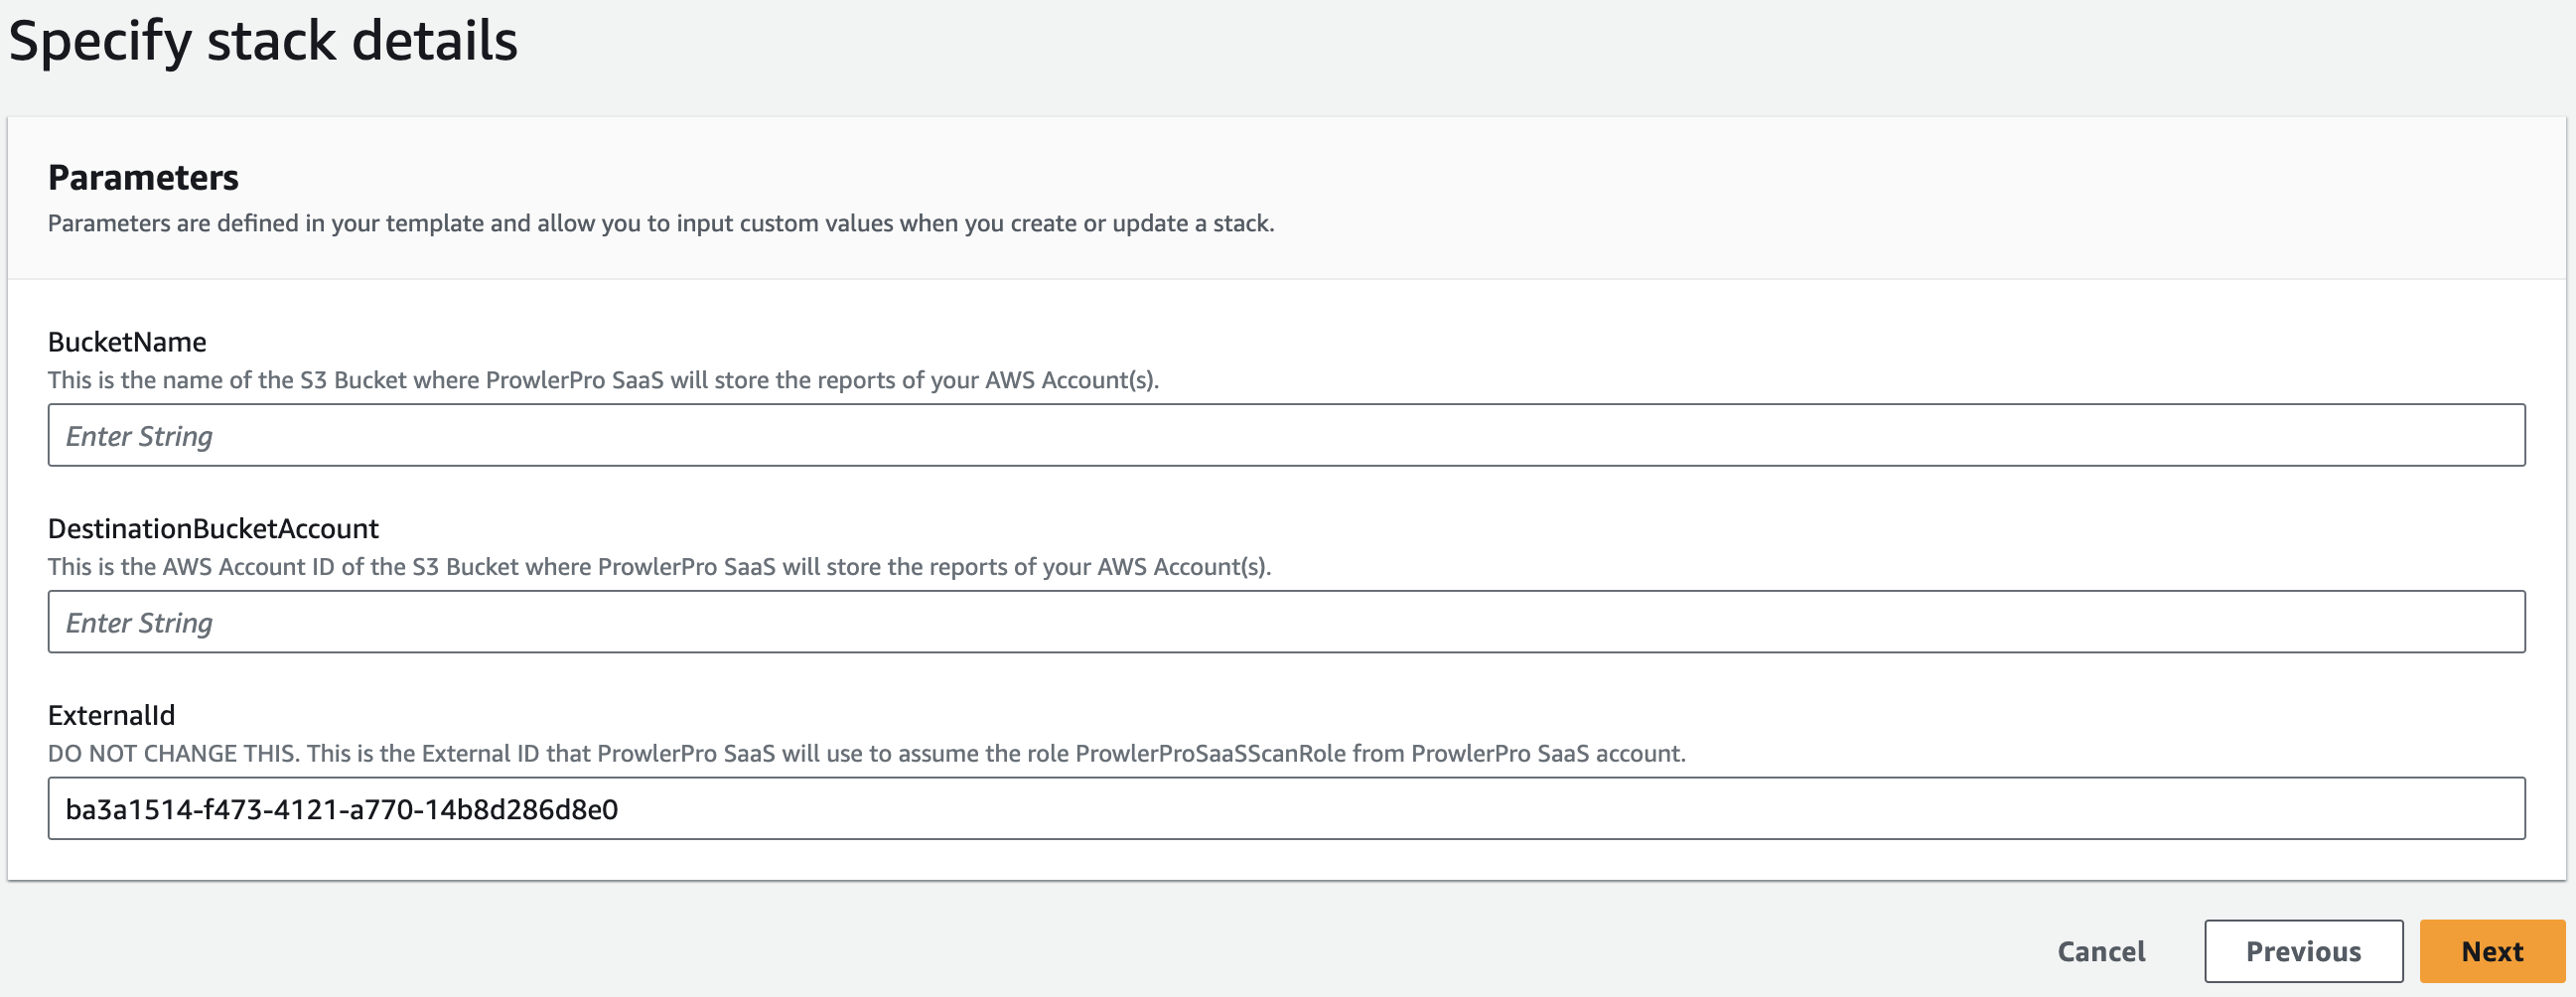
-
Then in the "Configure stack options" screen, again, leave everything as it is and click on "Next".
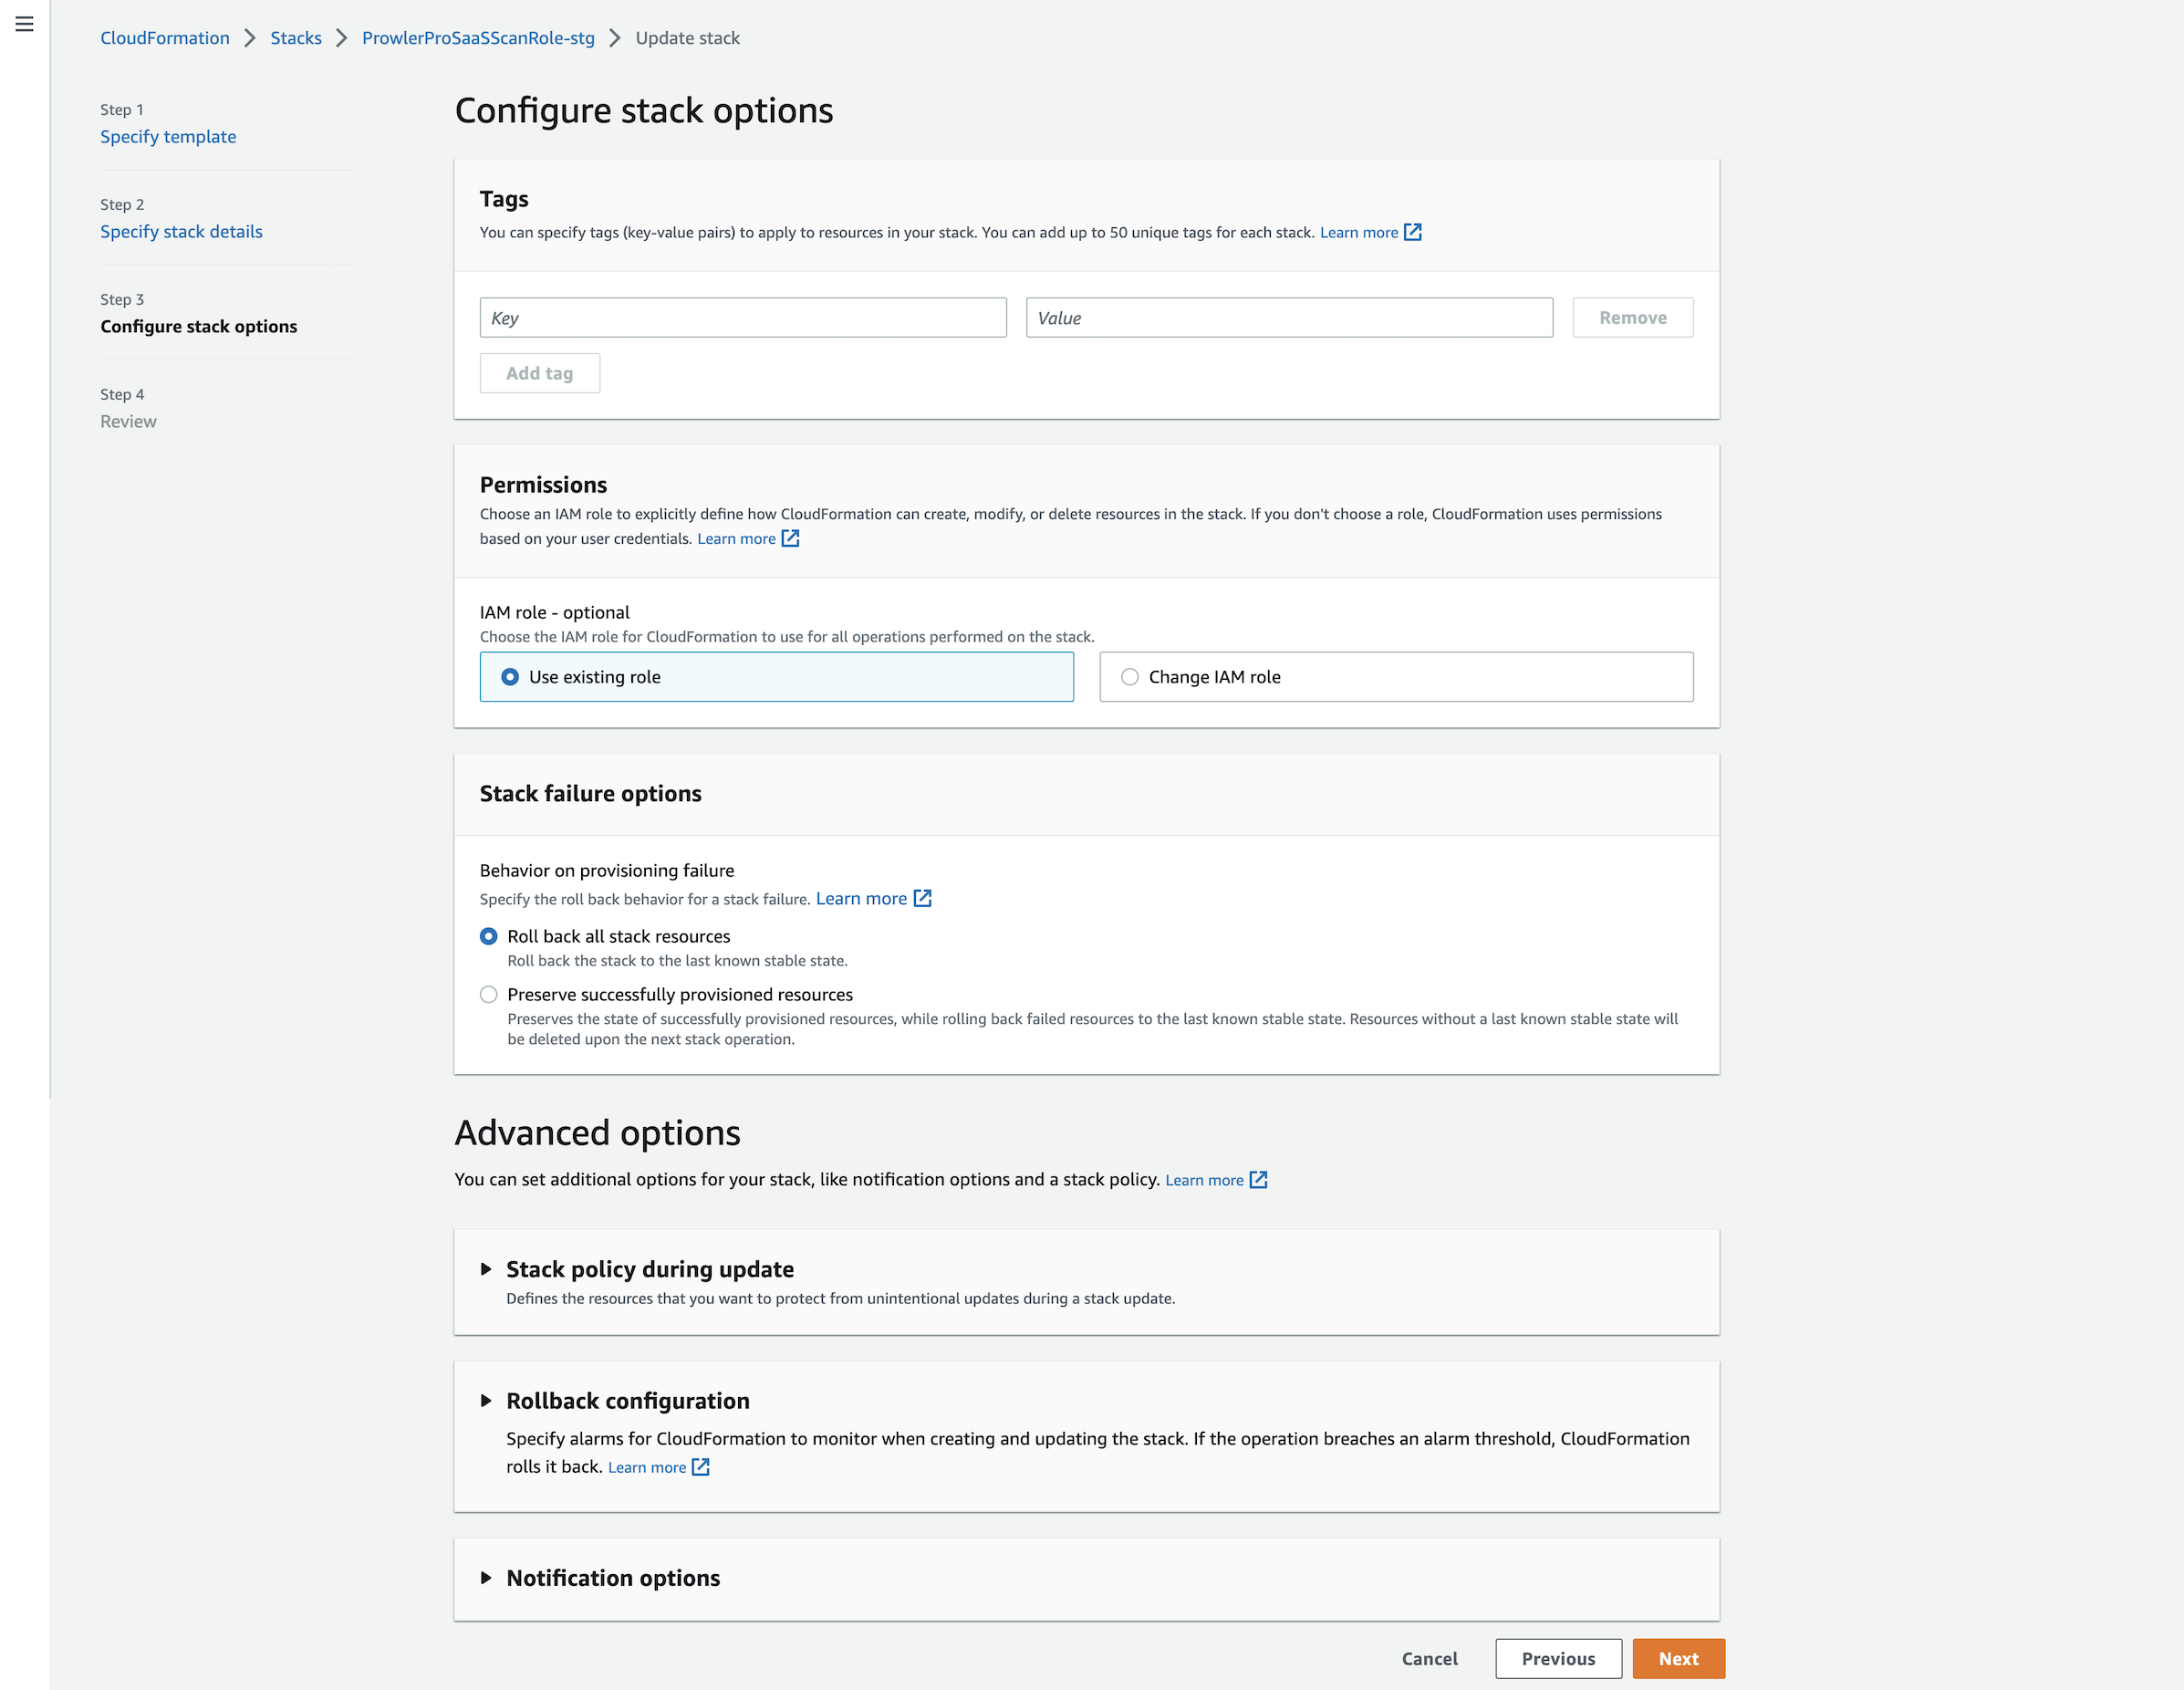
-
Finally, under "Review ProwlerProSaaSScanRole", at the bottom click on "Update stack" and your ProwlerProSaaSScanRole will be updated to the new version.
Update Prowler SaaS role with Terraform
To add the S3 integration to the ProwlerProScanRole using Terraform, please follow the next steps.
-
Get the above linked terraform template, in case you miss it you can find it here
-
Then, execute the following Terraform commands:
terraform init
terraform plan
terraform apply
As in CloudFormation case input variables must be filled:
bucket_namemust be filled with the destination bucket name (without any folders/paths or trailing slashes(/)), thus the bucket where you want your scan results to be stored.destination_bucket_accountmust be filled with the AWS account ID of which the destination bucket (referenced inbucket_name) belongs.
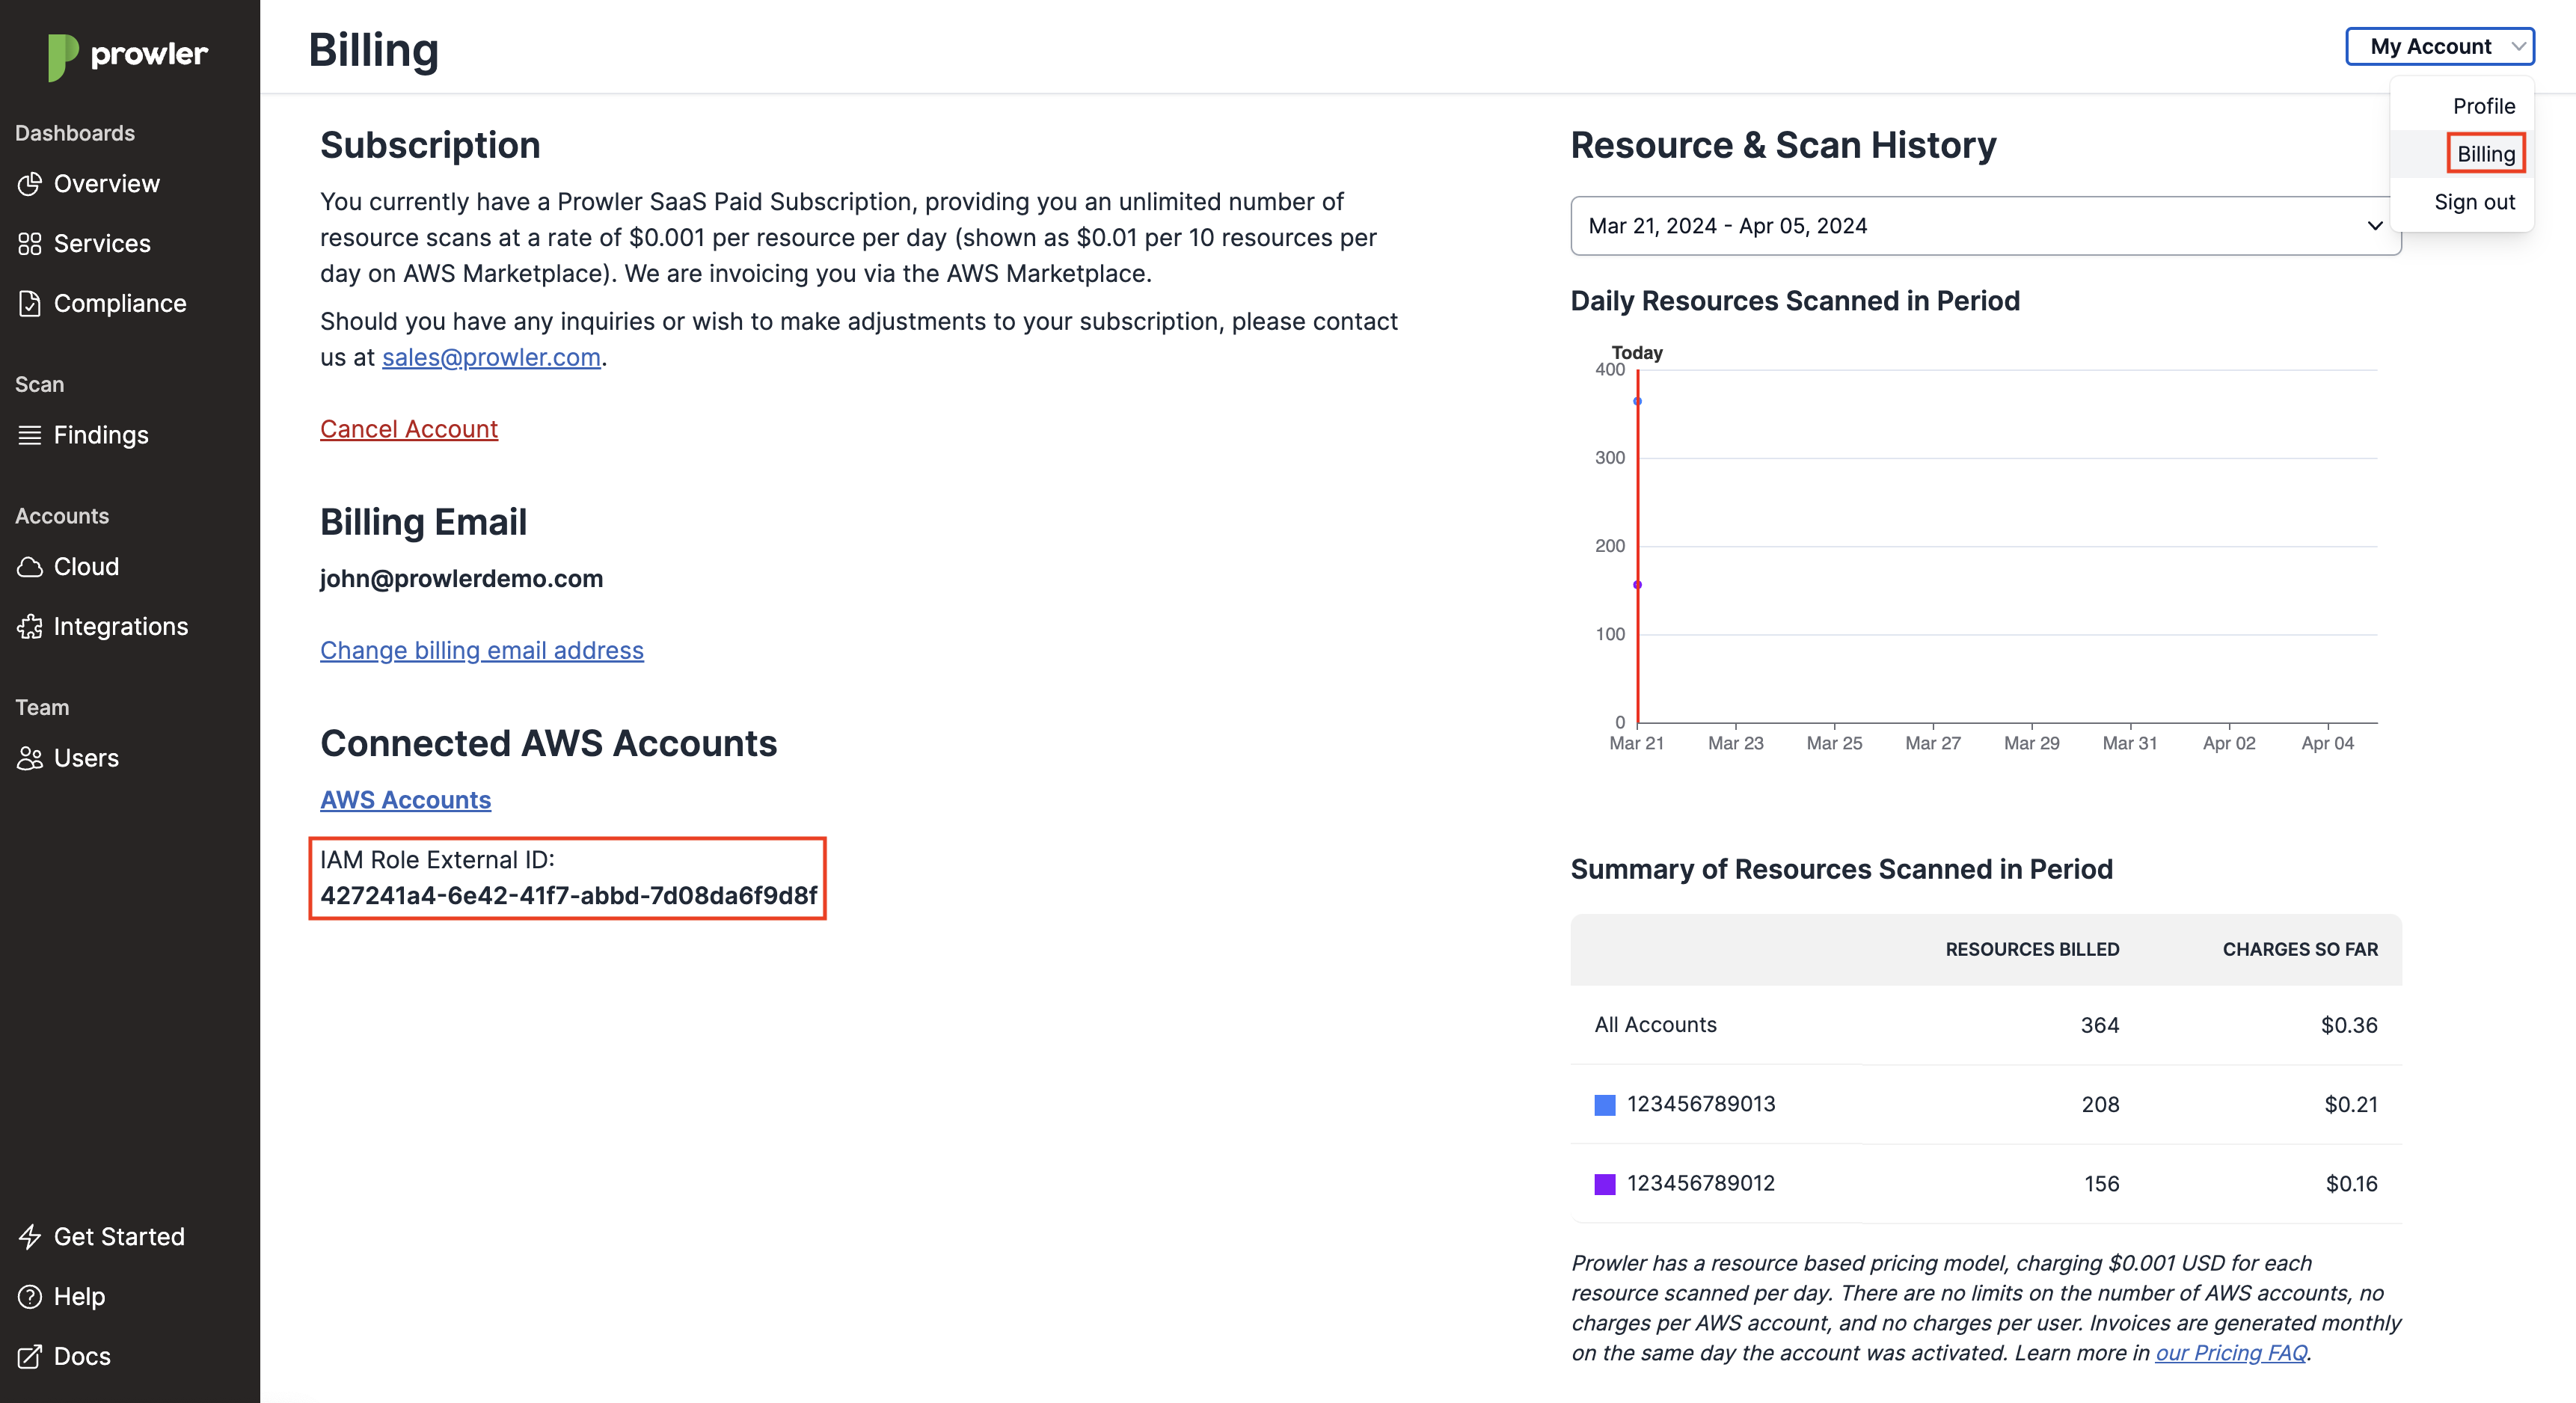
During the terraform plan and terraform apply steps you will be asked for your S3 Bucket Name, the AWS Account of your S3 Bucket and AWS External ID which you can find under the Subscriptions & Billing tab here.
Note
Terraform will use the AWS credentials of your default profile.
Step 2: Update your bucket policy
Once the role permissions are updated, we have three possible scenarios:
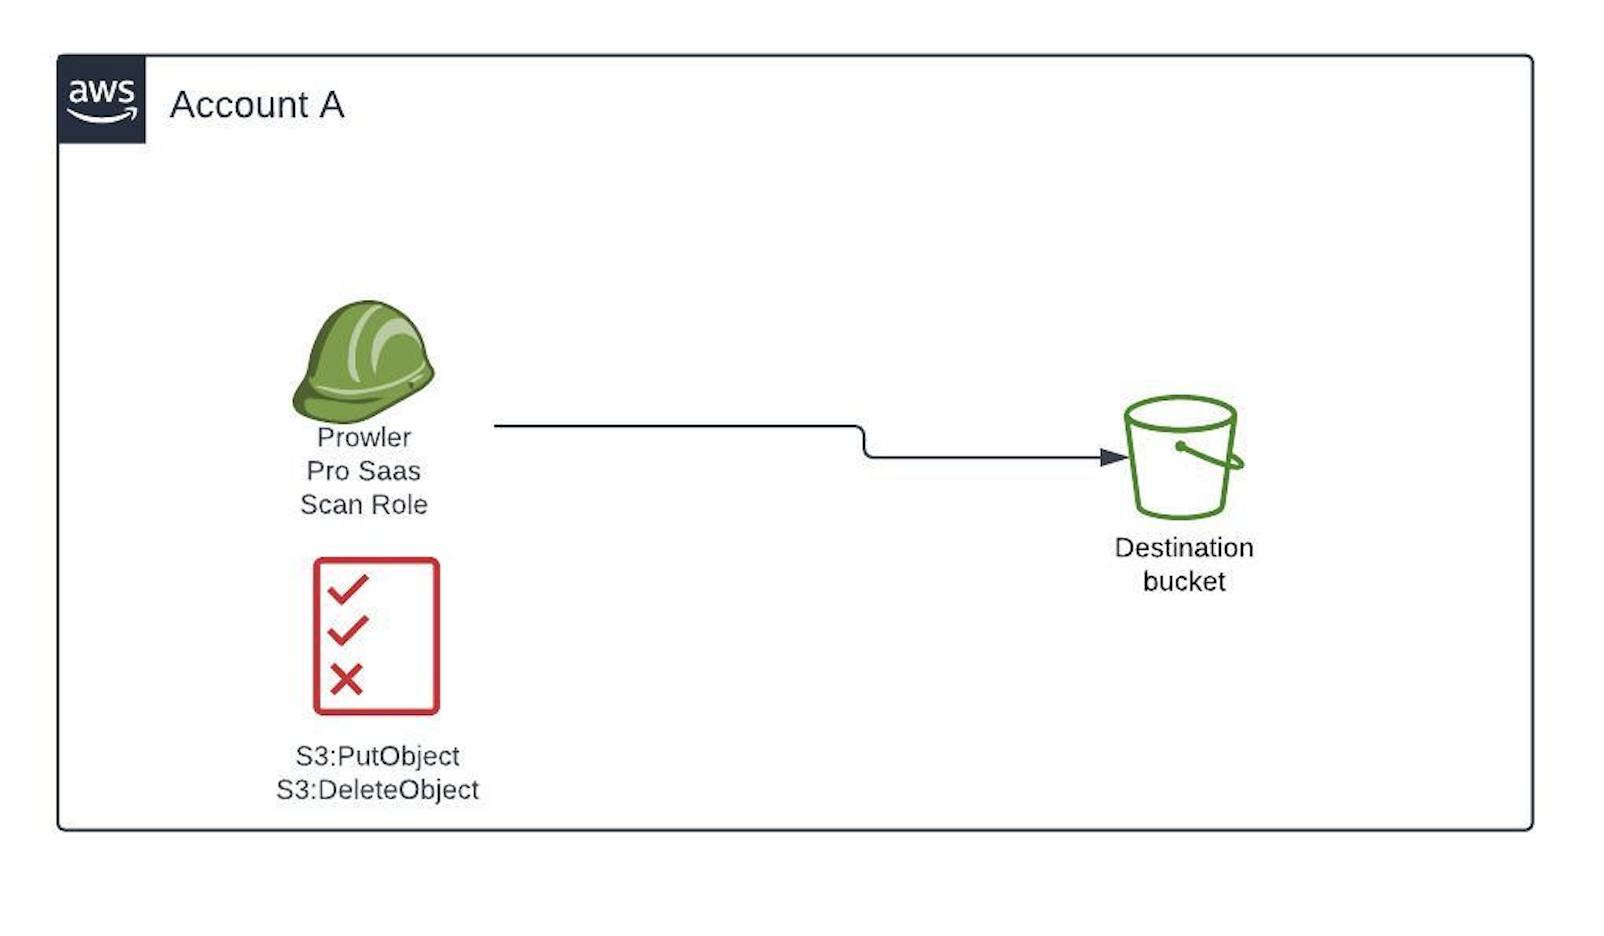
- The destination bucket belongs to the AWS account we want its results to be exported. In this scenario it is only required to apply the previous changes, since by default AWS resources can be accessed by other resources from the same AWS account.
- The destination bucket belongs to another AWS account.
In this case we also need to add a bucket policy in the destination S3 bucket that allows access from the AWS account we want its results to be exported.
A template for that policy can be found in the modal clicking on Click to copy the S3 bucket policy which will copy it to the clipboard.
The template has the following structure:
{
  "Version": "2012-10-17",
  "Statement": [
      {
          "Effect": "Allow",
          "Principal": {
              "AWS": "arn:aws:iam::AWS-ACCOUNT:role/ProwlerProSaaSScanRole"
          },
          "Action": "s3:PutObject",
          "Resource": "arn:aws:s3:::<BUCKET-NAME>/*"
      },
      {
          "Effect": "Allow",
          "Principal": {
              "AWS": "arn:aws:iam::AWS-ACCOUNT:role/ProwlerProSaaSScanRole"
          },
          "Action": "s3:DeleteObject",
          "Resource": "arn:aws:s3:::<BUCKET-NAME>/*ProwlerProBeacon"
      },
       {
          "Effect": "Allow",
          "Principal": {
              "AWS": "arn:aws:iam::AWS-ACCOUNT:role/ProwlerProSaaSScanRole"
          },
          "Action": "s3:GetBucketLocation",
          "Resource": "arn:aws:s3:::<BUCKET-NAME>"
      }
  ]
}
You will need to change the value <BUCKET-NAME> with the name of the destination bucket. After that you can add it as the resource policy of the bucket. When you copy the policy template from the modal the field AWS-ACCOUNT will be automatically filled with your AWS account number.
- The destination bucket belongs to another account and it is a multiaccount destination bucket (more than one account outputs the results in the same bucket).

If you want to add another account to the bucket policy, there is no need of replicating the whole policy. You can add it by transforming the existing policy of "Principal" key value to an array, adding more roles to that element, e.g:
{
    "Version": "2012-10-17",
    "Statement": [
        {
            "Effect": "Allow",
            "Principal": {
                "AWS": [
                    "arn:aws:iam::AWS-ACCOUNT:role/ProwlerProSaaSScanRole",
                    "arn:aws:iam::AWS-ACCOUNT-2:role/ProwlerProSaaSScanRole"
                ]
            },
            "Action": "s3:PutObject",
            "Resource": "arn:aws:s3:::prowler-reports-demo/*"
        },
        {
            "Effect": "Allow",
            "Principal": {
                "AWS": [
                    "arn:aws:iam::AWS-ACCOUNT:role/ProwlerProSaaSScanRole",
                    "arn:aws:iam::AWS-ACCOUNT-2:role/ProwlerProSaaSScanRole"
                ]
            },
            "Action": "s3:DeleteObject",
            "Resource": "arn:aws:s3:::prowler-reports-demo/*ProwlerProBeacon"
        },
        {
            "Effect": "Allow",
            "Principal": {
                "AWS": [
                    "arn:aws:iam::AWS-ACCOUNT:role/ProwlerProSaaSScanRole",
                    "arn:aws:iam::AWS-ACCOUNT-2:role/ProwlerProSaaSScanRole"
                ]
            },
            "Action": "s3:GetBucketLocation",
            "Resource": "arn:aws:s3:::prowler-reports-demo"
        }
    ]
}
Step 3: Enable the integration
Finally, we input the bucket name and path where we want the scan results to be exported. The following two formats are accepted.
- S3 bucket URI including or not the folder (you can add as much subfolders as you need), e.g.:
s3://bucket-name/bucket-folder/subfolder/... - A bucket name followed or not by the folder (you can add as much subfolders as you need), e.g.:
bucket-name/key-name/subfolder/...
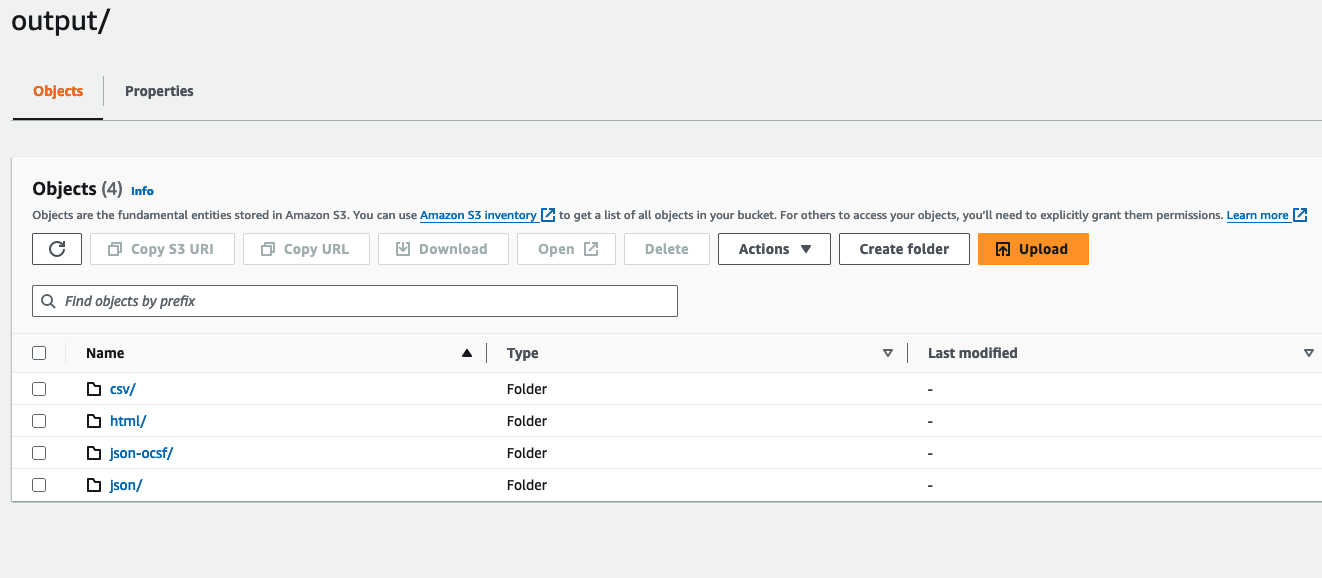
Prowler SaaS will create a folder inside the input bucket path named output including a folder per each output format (csv, html, json, json-ocsf) that contains the scan results with the following structure:
output
├── csv
│   └── prowler-output-AWS_ACCOUNT_NUMBER-DATE_1.csv
│   └── ...
│   └── prowler-output-AWS_ACCOUNT_NUMBER-DATEN_N.csv
├── html
│   └── prowler-output-AWS_ACCOUNT_NUMBER-DATE_1.html
│   └── ...
│   └── prowler-output-AWS_ACCOUNT_NUMBER-DATEN_N.html
├── json-ocsf
│   └── prowler-output-AWS-ACCOUNT_NUMBER-DATE_1.ocsf.json
│   └── ...
│   └── prowler-output-AWS_ACCOUNT_NUMBER-DATEN_N.ocsf.json
└── json
    └── prowler-output-AWS_ACCOUNT_NUMBER-DATE_1.json
    └── ...
    └── prowler-output-AWS_ACCOUNT_NUMBER-DATEN_N.json
With all configured, you can click on Test and add integration. Prowler SaaS will try to reach your destination bucket, put an empty object in the bucket called ProwlerProBeacon and delete it.
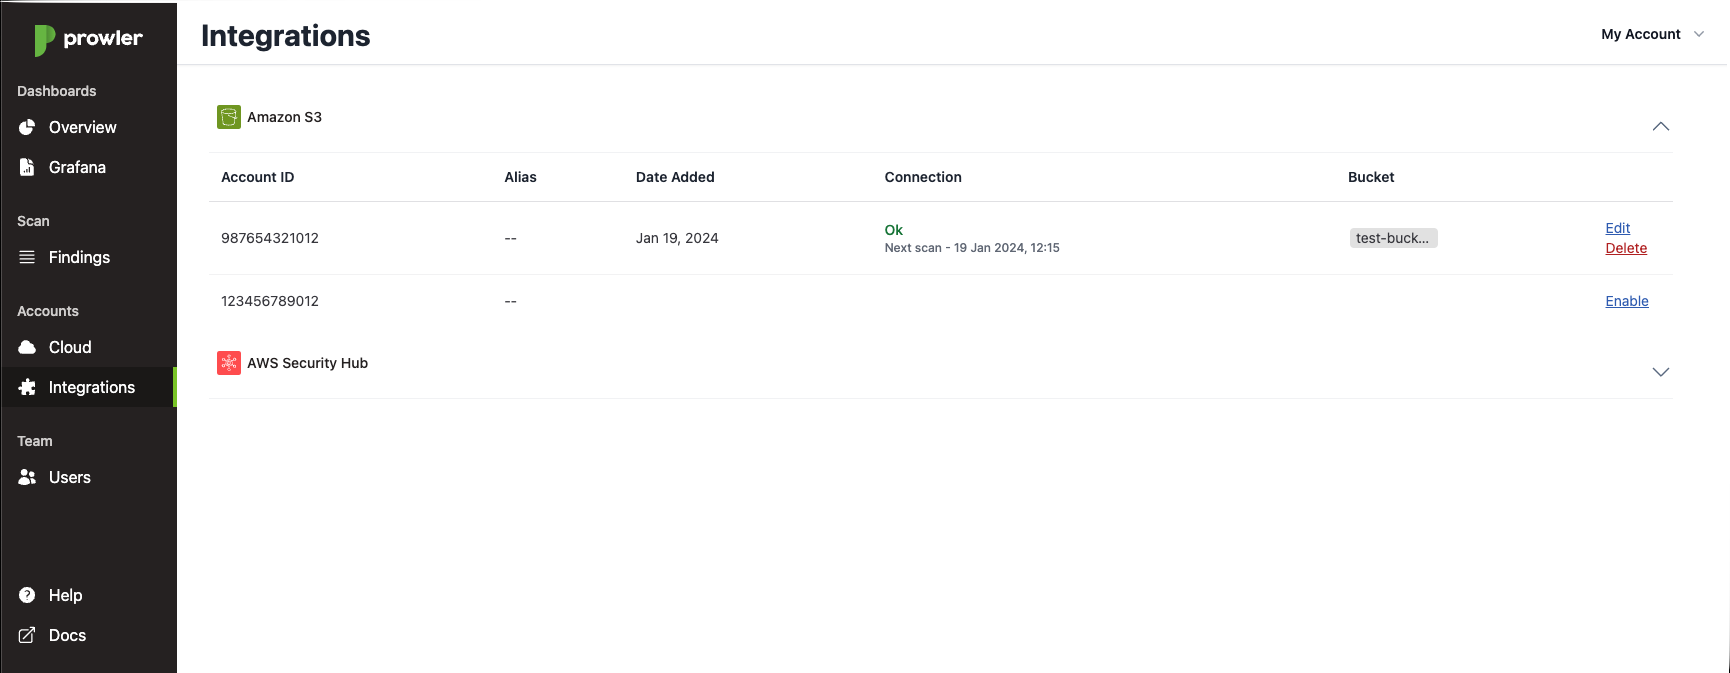
If everything goes well the integration will be configured and you will see it in the Integrations tab:
If do not, please do not hesitate to contact us at [email protected].
As it can be seen in the previous capture, it will be displayed the date when the integration was added, if the bucket is reachable or not from Prowler SaaS and the name of the bucket. Also the ability of edit the integration (change the bucket name/bucket path) and delete it. If you want to change the destination bucket or just the bucket path just click on edit, the modal will be shown again allowing you to change it.
Next time your AWS account is scanned (you can check next scan time just below of the bucket connection status under Connection column) you will see the results in the bucket.